START WITH THE WATER LOCATION
Where is your fridge leaking water?
Before changing settings or pulling the appliance out, dry the accessible wet area and note where water reappears. Check whether the refrigerator is still cold and whether yours has a plumbed-in dispenser or ice maker. Those details help distinguish a drainage problem from an active supply leak.
Choose a leak pattern to see the best safe first check.
| Where water appears | Likely systems to inspect | First safe observation |
|---|---|---|
| Under vegetable / crisper drawers | Accessible condensation channel or blocked drain | Look for a visible drain hole in the rear wall if your model has one |
| On rear fridge wall | Normal wet-wall condensation, blocked channel, food touching wall | Check whether droplets drain away or form a persistent pool |
| On floor at front | Door seal, condensation, internal overflow or water line | Check door closure, visible drips and whether it is plumbed in |
| Behind or under fridge | Evaporation tray, drain tube or household water feed | Observe from an accessible side—do not move a heavy appliance alone |
| At dispenser or filter | Filter seating, water valve, tubing or dispenser | Close the water supply if leaking continuously; consult manual |
| Ice in freezer followed by puddle | Frozen or clogged concealed defrost drain | Look for recurring ice; request service for hidden components |

HOW WATER MOVES
Why a fridge produces water in the first place
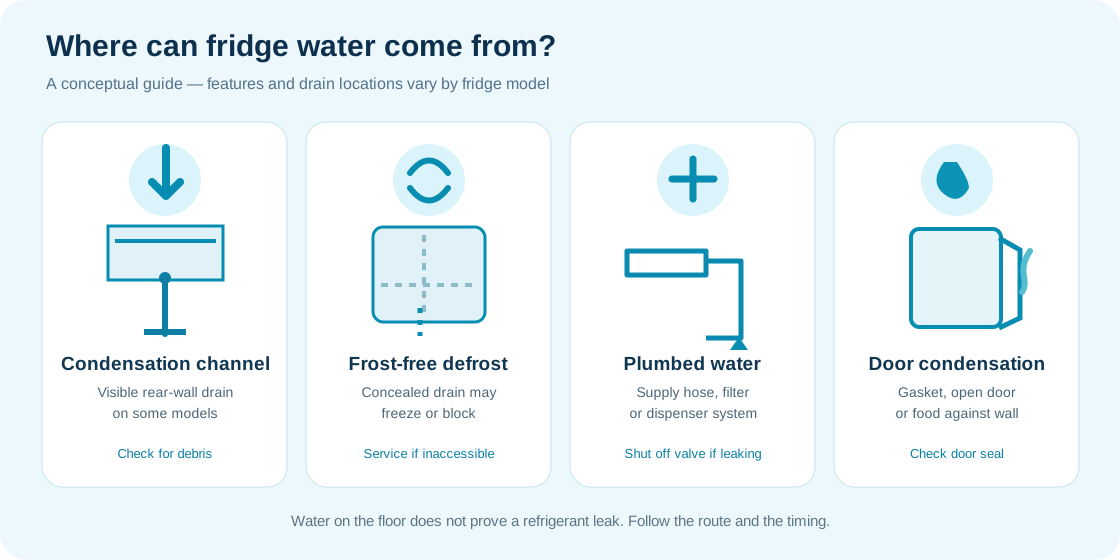
Cold surfaces pull moisture out of warm air. In some conventional or wet-wall refrigerators, condensation forms as droplets on the rear interior wall and runs into a small channel or drain opening near its base. The water then travels to an evaporation tray, often close to the warm compressor, where it evaporates.
Many frost-free models have a different route: frost forms on a concealed evaporator and is periodically melted during an automatic defrost cycle. That water should drain through an internal pipe to the evaporation tray. If the concealed drain blocks or freezes, water may collect under drawers, on a freezer floor or outside the cabinet. That system often isn't accessible to homeowners.
A plumbed-in fridge has an entirely separate source of water: the household feed serving a dispenser or ice maker. Its hose, filter or fittings can leak even when the refrigeration system itself works normally.
Gently clean only the manufacturer-designated accessible opening with the supplied tool, soft cloth or damp cotton bud.
Hidden drain lines, water valves, live electrics and refrigerant circuits should be assessed by a qualified technician.
COMMON ON WET-WALL FRIDGES
1. Water underneath the salad drawers
If water pools beneath the vegetable drawers and the fridge otherwise keeps food cold, a blocked condensation drain is a frequent cause on models that have a visible rear-wall drain. Vegetable scraps, packaging or residue can obstruct the small channel, allowing condensation to overflow into the bottom of the compartment.
- Remove the drawers and food obstructing the area, following food-safe storage practices.
- Wipe up the existing water so you can see the source.
- If your model's manual shows an accessible drain hole, gently clear surface residue with the supplied cleaning tool or a damp cotton bud, as instructed by the manufacturer.
- Wipe away loosened debris and check over subsequent normal use whether water is reaching the drain.
Do not force wire, sharp tools or chemicals into a drain. Do not remove interior panels to find a hidden opening. If the water returns quickly or the drain is frozen behind a cover, arrange service.
CONDENSATION OR OVERFLOW?
2. Water droplets on the back wall
On many wet-wall fridges, a fine film of condensation or small droplets on the rear wall are part of normal operation. The water should run down to the drain channel and disappear. Persistent pooling on a shelf or underneath drawers indicates that the water isn't taking its intended route.
Check that packets, bags and food containers are not pressed against the rear wall; they can divert droplets onto shelving. Inspect whether the door closes against its seal, especially after loading bulky items. Repeatedly leaving the door open lets more humid room air in, creating more condensation and potentially frost.
If a model has repeated heavy icing followed by meltwater, that is different from ordinary surface droplets. Confirm the temperature using a thermometer and seek further assessment if the pattern continues.
FLOOR WATER IS A CLUE
3. A puddle in front of the fridge
A puddle in front can originate from a tray, door, or hidden internal drain; it doesn't by itself identify a failed component. First rule out spilled drinks, melting ice cubes, or condensation from another nearby appliance. Dry the accessible floor and check the first point that becomes wet again.
If the door isn't closing well, humid room air enters, leading to extra moisture. Inspect the gasket for crumbs, folds, trapped packaging and obvious splits. Clean the seal according to the manual and confirm shelves and drawers aren't preventing full closure. Some models require a specified slight backward tilt to help doors close and water drain; don't guess at the levelling angle or move the appliance alone.
If a regular puddle appears after a defrost cycle, a hidden drain or tray problem may be more likely. If water appears continuously on a fridge with a dispenser, treat the plumbed water feed as a priority instead.
REAR AND UNDERNEATH
4. Water beneath or behind the appliance
Automatic defrost systems commonly direct meltwater to an evaporation pan near the compressor. The tray is expected to contain some water at times. A cracked tray, displaced drain outlet, unusual overflow or mis-levelling can allow it onto the floor. On plumbed models, a loose or split supply tube can make an apparently similar puddle.
Check for water along an accessible route or visible household supply line without pulling out a heavy fridge, moving electrical cables or removing panels. If the leak continues while the dispenser hasn't been used, it could be a continuously pressurised connection. Close the accessible water shut-off valve if safely possible and arrange repair.
If the appliance is unplugged for safety, keep the door closed while you arrange food storage. Don't leave perishable food warming during a lengthy investigation.
PLUMBED-IN APPLIANCES
5. Water dripping from a dispenser or after replacing a filter
A water dispenser or ice-maker feed connects the appliance to a household water supply. A loose filter, incorrectly seated cartridge, damaged O-ring, cracked filter housing or hose fitting can produce dripping or a persistent leak. Some models also hold residual droplets at the dispenser outlet, so the quantity, timing and duration matter.
- Check whether the leak began immediately after a filter was changed.
- Use the manufacturer instructions to verify the exact cartridge is compatible and correctly locked into place—don't force fittings.
- Observe accessible connections for moisture without disturbing pipework.
- For a continuous leak, close the appliance's accessible water supply valve if safe, then arrange qualified inspection.
A drip at the dispenser, ice-maker fill tube and filter housing are not interchangeable faults. If a filter housing is cracked or water continues with correct installation, do not keep repeatedly operating the dispenser to test it. Seek service.
FROST-FREE FREEZER SYMPTOMS
6. Ice on the freezer floor, followed by water
An ice sheet at the base of the freezer can occur when defrost water cannot escape through a concealed drain. It may freeze during one cycle and overflow or melt later. Some models have a drain heater or defrost-related fault that causes the problem to recur.
Do not use a knife, metal rod, hair dryer or high-temperature water to break away ice. Those methods can damage liners, electrical systems or refrigerant pipes. A manufacturer-approved defrost method may temporarily clear accumulated ice, but if the cause is a hidden blocked tube, it can return and needs professional assessment.
For a freezer that isn't maintaining safe temperatures, follow the food-storage advice in the freezer not freezing guide.
SAFE TROUBLESHOOTING
Five checks to make before booking a repair
- Prioritise electricity and water safety. Avoid wet plugs and electrical parts; isolate power only if safe. Close a plumbed water valve if the feed appears to be leaking.
- Locate the first wet spot. Dry accessible surfaces, note time of day and whether water is inside the compartment, on the floor or at a dispenser.
- Check the door and food placement. Look for trapped containers, damaged seals and food touching a wet rear wall.
- Clean accessible drains only. If your manual identifies a visible condensation hole, remove surface debris using the approved gentle method.
- Document the pattern. Take a picture, record whether cooling is normal and note whether the leak follows defrosting, dispenser use or a filter change.
Visible drain channel, door seals, condensation, spilled water, accessible shut-off valve.
Hidden frozen drains, damaged filter housing, concealed tubing, cabinet removal, electrical or sealed refrigeration faults.
WHEN TO STOP
When does a leaking fridge need professional repair?
Arrange service for a persistent leak that returns after appropriate cleaning, repeated freezer ice sheets, a cracked dispenser or filter housing, water at concealed connections, a suspected failed evaporation tray, or any leak associated with poor cooling.
Urgent warning signs: Water flowing near plugs or sockets, electrical crackling, burning smells or tripped breakers. Avoid contact with the wet area and isolate power only from a safe, dry point. Don't operate the appliance until professionally assessed. If you suspect damaged refrigerant pipework, ventilate safely, avoid ignition sources and call a refrigeration professional; do not attempt to cut or repair the sealed circuit.
Food-safety note: A water leak doesn't always mean the fridge is too warm. Check the temperature with a thermometer and move perishable items into reliably cold storage if the appliance has been turned off or is failing to cool. Consult official guidance for your location.
COMMON QUESTIONS
Frequently asked questions
Why is water collecting under my fridge's vegetable drawers?
On a fridge with a visible rear-wall condensation channel, a blocked drain is a common explanation. Check the accessible channel only as directed in your manual. Frost-free models may have a concealed drain instead.
Is water on the back wall of a fridge normal?
Small droplets on a wet-wall fridge can be normal when they drain away. Persistent pooling, heavy ice or water reaching food and drawers suggests the water isn't flowing as intended.
Why is my fridge leaking onto the kitchen floor?
Possible causes include an overflowing defrost drainage route, door-related condensation, a tray problem or a plumbed supply leak. Where the puddle starts and whether the fridge has a water line are more useful than its final position.
Can a fridge leak even if it is cooling normally?
Yes. A clogged accessible drain, damaged gasket or a dispenser water line can leak while the cooling system continues working. Temperature still needs monitoring.
Why did my fridge start leaking after a water-filter change?
An incorrectly seated or incompatible filter, damaged seal or housing may be responsible. Follow the manufacturer's exact installation instructions and shut off a continuous water leak rather than repeatedly testing the dispenser.
Does a puddle mean the fridge has leaked refrigerant?
Usually not. A water puddle is much more commonly condensation, defrost water or a supply-line leak. Refrigerant faults are a separate issue; do not handle or puncture suspected refrigerant tubing.
OFFICIAL GUIDANCE & FURTHER READING
Manufacturer guidance and related fixes
Drainage layouts, visible drain holes, water filters and ice makers differ by model. These official resources should be read alongside your own appliance instructions.